A Complete Step-by-Step Guide for HDD to SSD Migration
Contemplating a computer upgrade can be scary, especially attempting something as drastic as migrating from a standard Hard Disk Drive (HDD) to a Solid State Drive (SSD). But trust us, it's worth it. This simple change can dramatically improve your computer's speed and functionality
How do you know if it's time to make this change? If, like us, you grumble at your system as it boots for far too long. Once you see the difference between using an HDD and an SSD, you'll wonder why you waited so long.

In this guide to upgrading your hard drive, we'll thoroughly describe each step. Whether you are tech-savvy or ground-level, we've got you. At each stage, we'll break everything down into easy-to-handle pieces.
By the end, you will have a faster computer as well as the accomplished feeling of taking charge of your own machine's maintenance. Enough talking—let's dive in and get your system running like new!
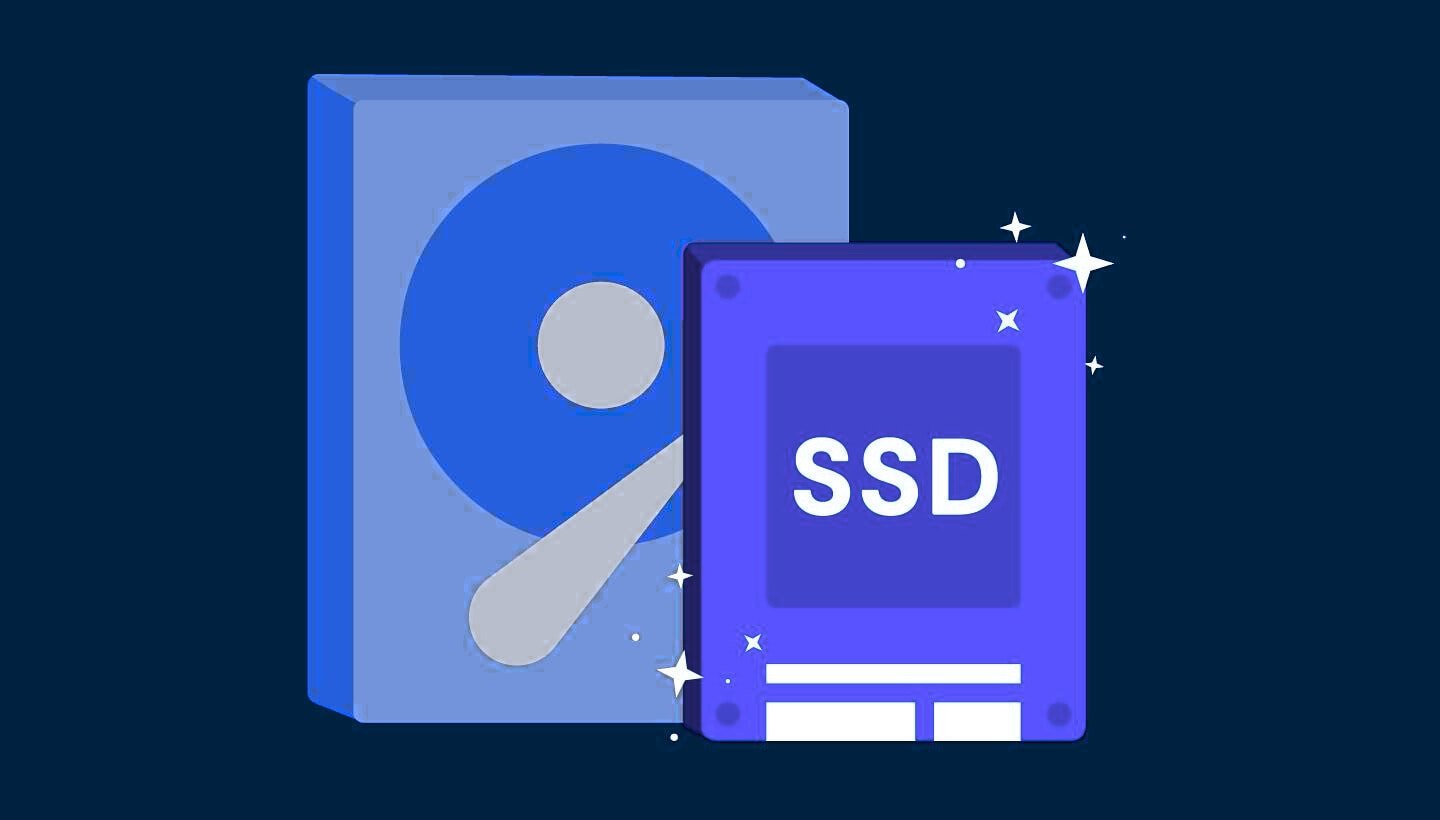
Solid-State Drives (SSD Storage)
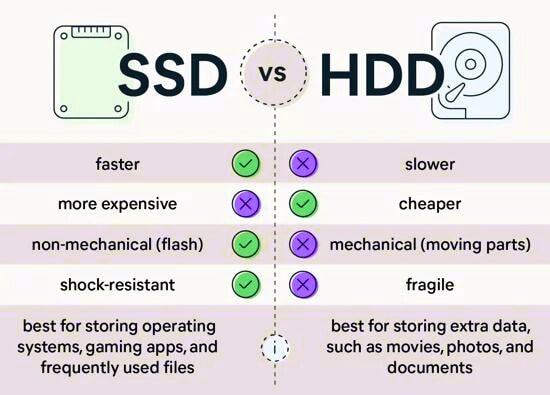
Imagine a computer that is ready to go seconds after booting up. That's the beauty of a solid-state drive. Most hard drives used in the past had moving parts, but solid-state drives do not, making them quicker and more dependable.
If you're are tired of waiting for your system to play catch-up, a fresh SSD is a new lease on life for your tired old PC. It's about the simplest and most effective upgrade you can do. Whether you want to solve boot timing or do some heavy applications to run smoothly, the SSD is your computer's new best friend.
Hard Disk Drive (HDD Storage)
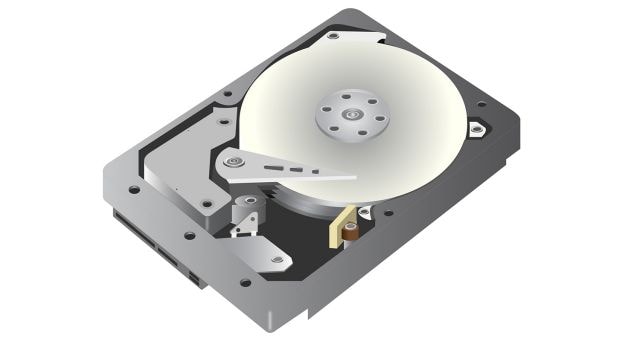
If you ever wondered why your computer takes its sweet time on boot, it's because of the HDD (hard disk drive). HDDs have traditionally been the workhorses of storage, using spinning disks that have underpinned storage for years.
They provide ample space at a comparatively reasonable price, but do not win any speed awards. If you've been experiencing sluggish performance, your HDD is outpaced. It might store large files effectively, but an upgrade to an SSD will unlock more speed and responsiveness.
A History of HDDs and SSDs
How did we go from those clunky, prolonged hard drives of the past to the objectively speedy SSDs we enjoy nowadays?
It all goes back to the 1950s, when IBM developed the first hard disk drive (HDD).
Imagine something the size of a refrigerator with whirring magnetic disks. That's the primitive model of what we now call a hard drive. This early HDD could store a stunning 5MB of data, which was a lot for those times! For decades, the current HDD became progressively smaller, speedier, and able to handle more storage.
By the 1980s, HDDs had become standard on personal computers and workhorses in the digital world. Demand for speed and reliability gradually increased, until the solid-state drive was introduced, a game-changer in storage technology.
HDDs in laptops depend on mechanical movement. But SSDs use flash memory, similar to what is used in USB stick (just much more advanced). This innovation, which became more popular in laptops in the late 2000s, offers faster access to data with less power consumption and greater durability.
No more delays backed up by thrashing spinning disks hunting down your data; everything happens immediately with SSDs. Now, you're probably enjoying the benefits of SSDs since they became pocket-friendly and accessible.
If you're upgrading from an HDD or just curious about how your machine's tech goes, seeing how far we have come is just as dazzling. And who knows?
Why Upgrade HDD to SSD
If your computer feels too slow or takes too long to boot, then it is probably time to upgrade from a current HDD to an SSD. Trust me; I've been there, and switching turned out to be an excellent move.
Imagine just powering on your computer, and you are all set within seconds—this is one of the most immediate benefits you'll get with an SSD. While HDDs rely on spinning disks to read and write data, SSDs take advantage of Flash memory for write speeds. This also means no mechanical movement, which equals faster boot times and quicker file transfers.
It's not all about speed, though. SSDs are also more reliable and durable because they have fewer mechanical failures. If you are a mobile user or use your laptop in less-than-ideal conditions, such as bumpy conditions or rough handling, an SSD can withstand this kind of movement without problems.
How to Clone a Hard Drive to an SSD
It's not just about upgrading to the latest technology; the actual goal here is making your digital life more manageable. Treat your computer—and you—to what you deserve with this upgrade.
Step 1: Upgrade Preparation
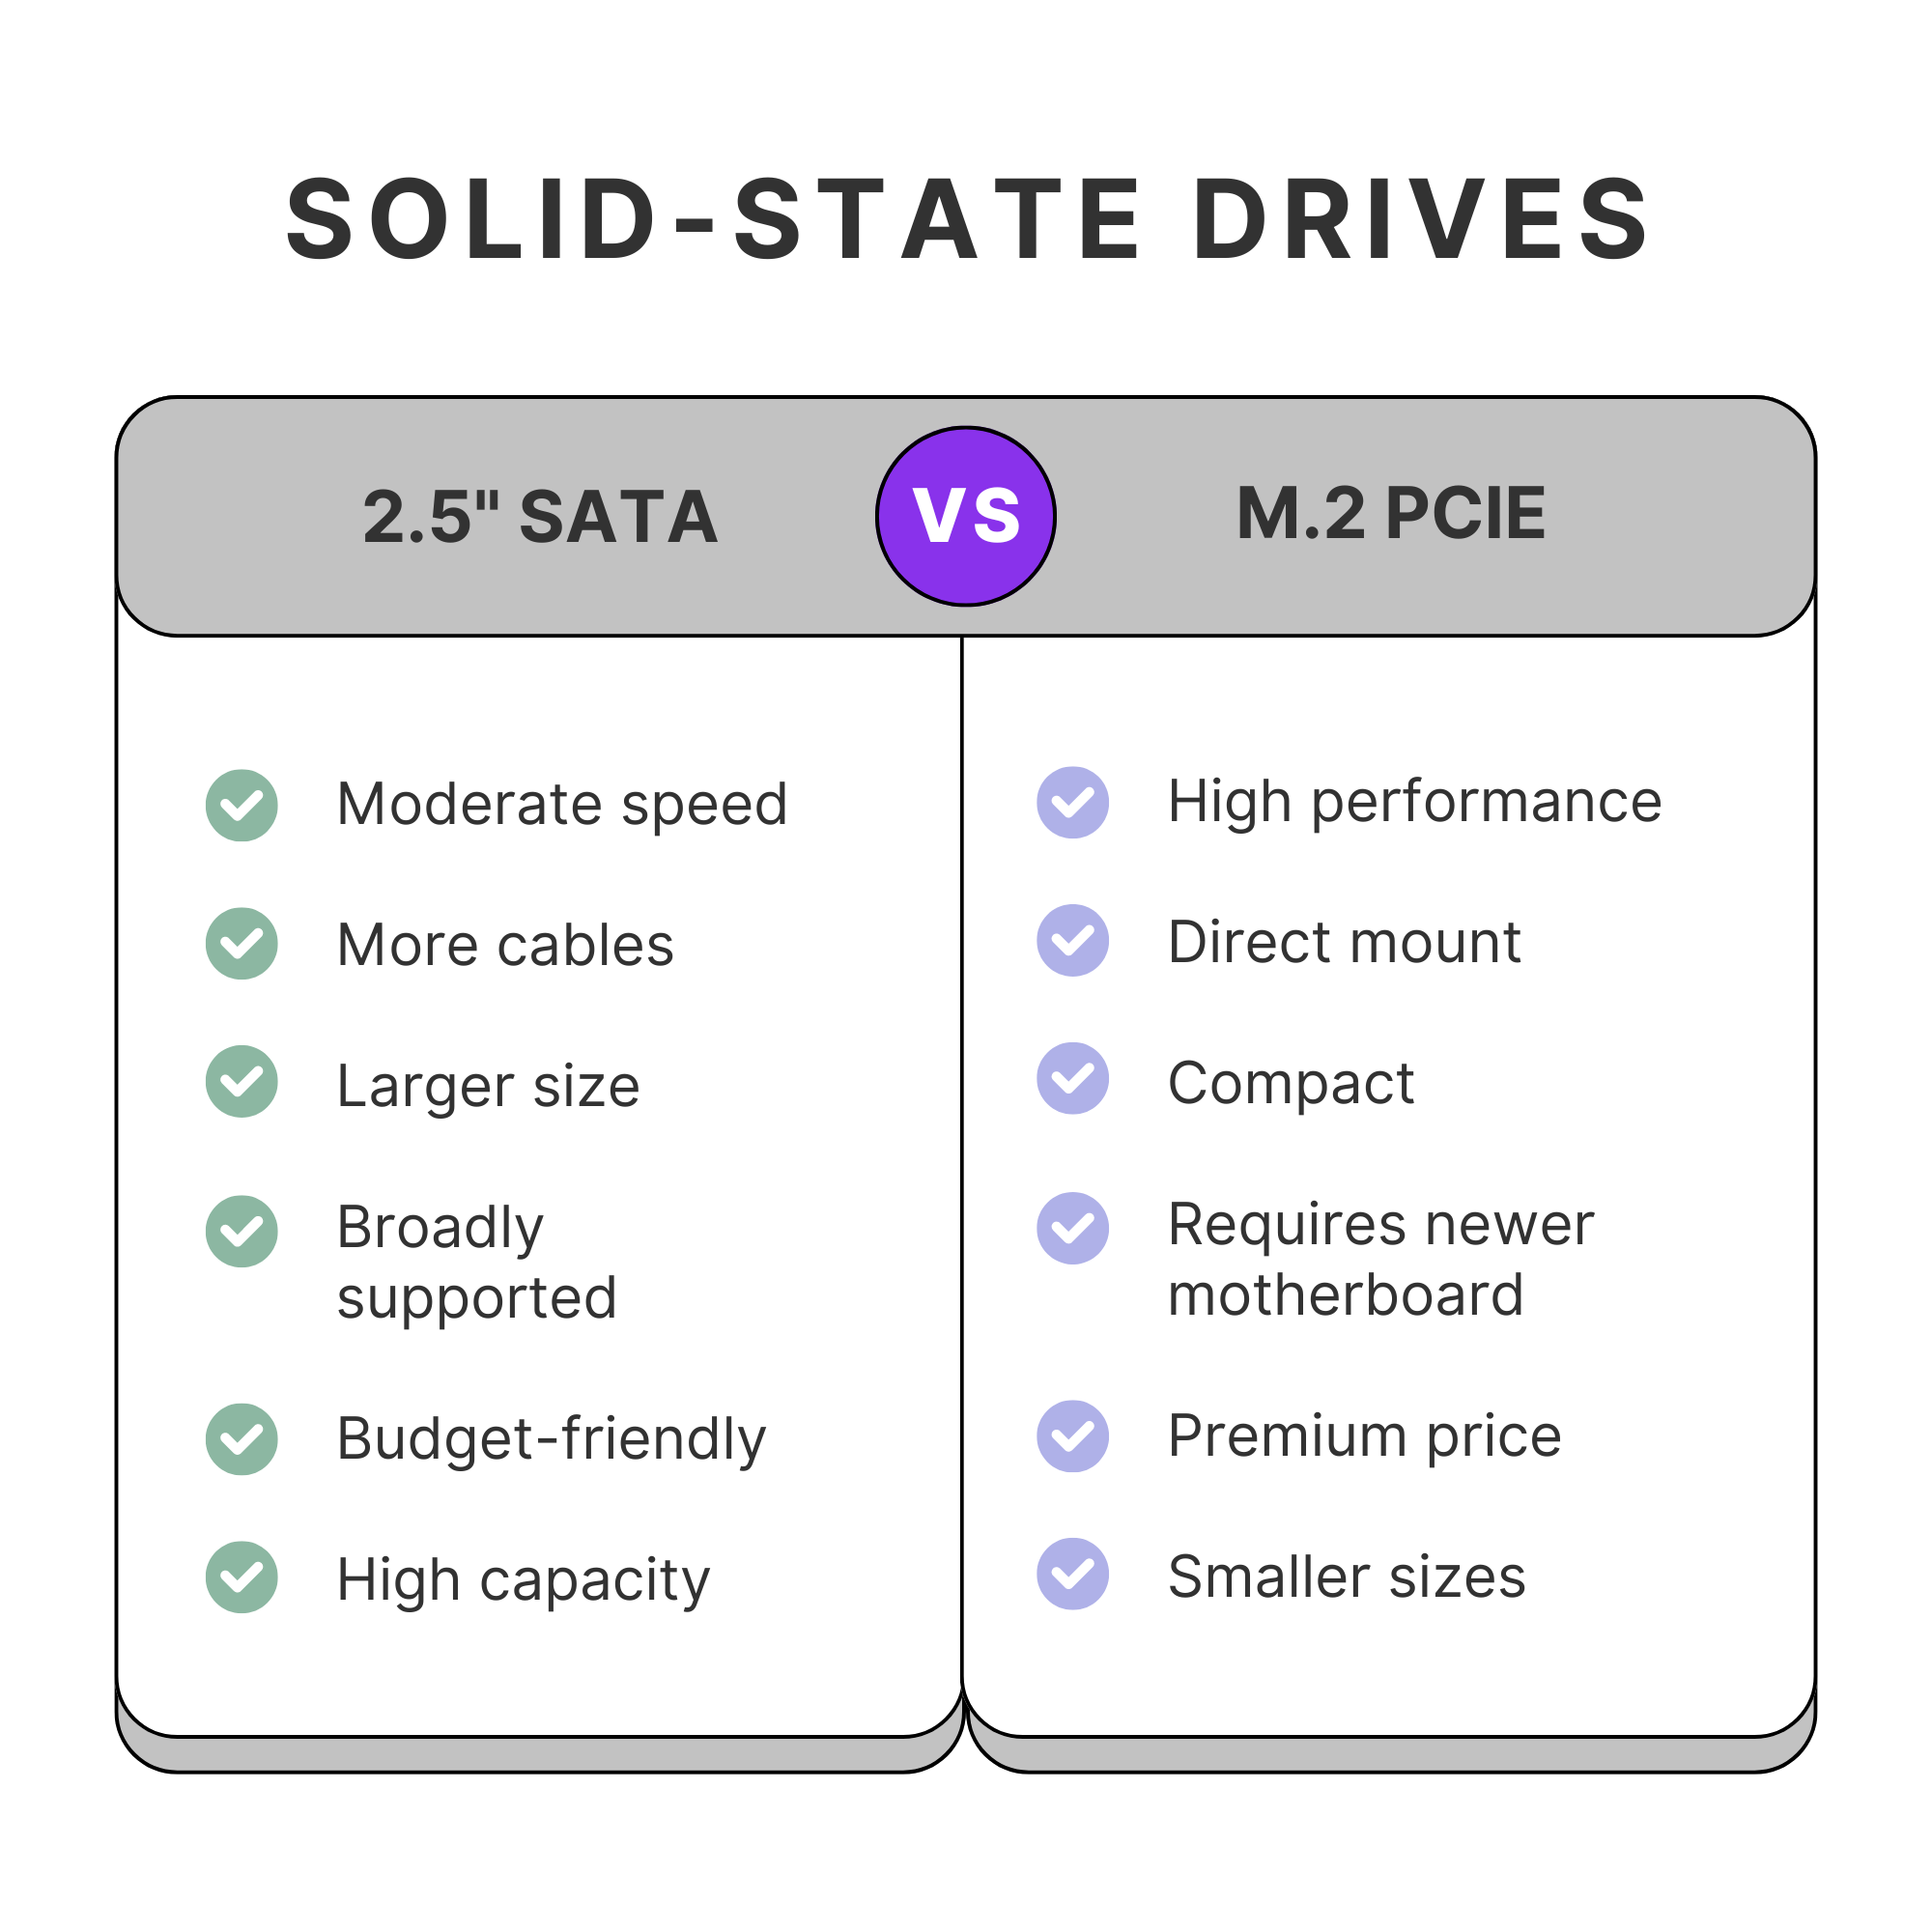
The most important step in preparing for the hard drive upgrade is getting ready for a seamless transition. First, choose an appropriate SSD that will best suit your needs. This should include capacity, speed, and form factor, according to your system's specifications.
For example, a 2.5-inch SATA SSD will do in the case of a laptop, but an M.2 PCIe SSD is what you want for desktop PCs to realize significantly improved performance.
Next, get all your tools ready. You will need a small Phillips screwdriver to open your computer's case and mount the SSD. Be sure to download and install some trustworthy disk cloning software, too. This software will help you clone your old drive with your operating system and data into the SSD without hassle, so you won't have to install everything from scratch again.
Finally, back up your data. Ensure you have saved the key files when you run the upgrade on an external drive or in the cloud. Caution will help keep all important data safe from any possible hazards that may arise during the upgrading process. Following these steps will prepare you for a smooth and successful SSD upgrade.
Step 2: Initialize the SSD
Once you have your SSD and are pretty much set for the switch, then you will need to initialize the drive. This is one of those very important steps that'll let you recognize and be ready to use your SSD. Here's how to do it easily:
Connect SSD to Your Computer: First, connect your SSD to your computer. On a desktop, simply plug it into one of the open SATA ports inside your motherboard or case. If you have a laptop, this most likely means that you also need a SATA-to-USB adapter.
Open Disk Management: Next, right-click the Windows Start button and select "Disk Management." This will open the Disk Management utility and bring up all of the connected drives.
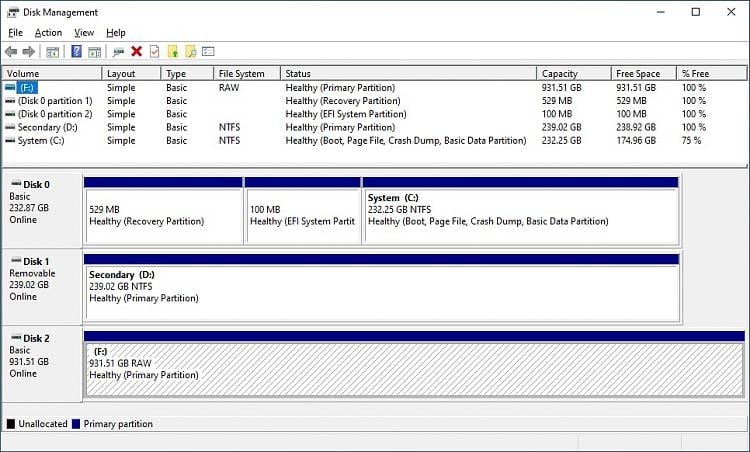
Initialize the SSD: Locate your new SSD in this list. It's usually "Disk X" with a black bar overtop, indicating that it contains unallocated space. Right-click the SSD, then select "Initialize Disk."
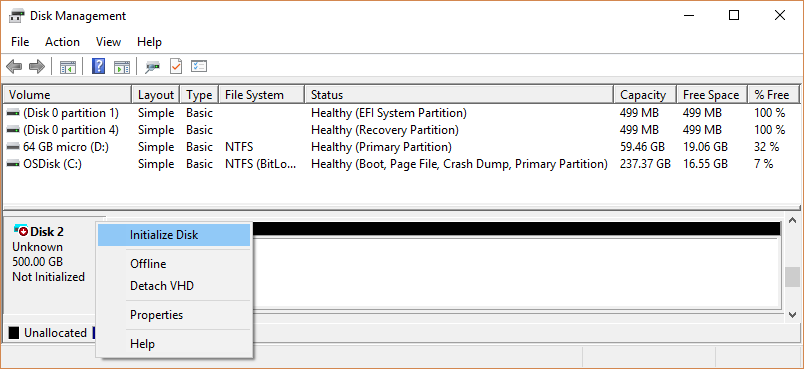
Now, you'll be prompted to choose a partition style; either MBR or GPT will work. Most modern systems support GPT, because it supports larger drives and allows more partitions.
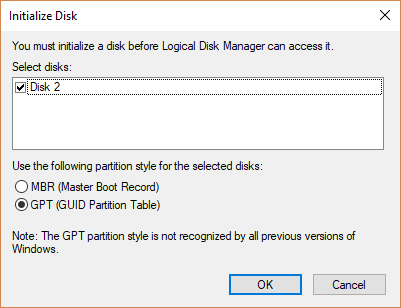
By initializing, you're preparing your SSD for a good start so that it's ready to accept your OS and all your files. This is like cleaning the slate for a smooth transition from an old hard drive.
Step 3: Clone the Hard Drive
Now that your SSD is initialized and ready to use, you will clone your old hard drive to the new SSD. This step is essential to move all of your documents, programs, and settings without needing a clean installation of Windows. Follow our step-by-step guide to help you through this process:
1. Choose Reliable Cloning Software:
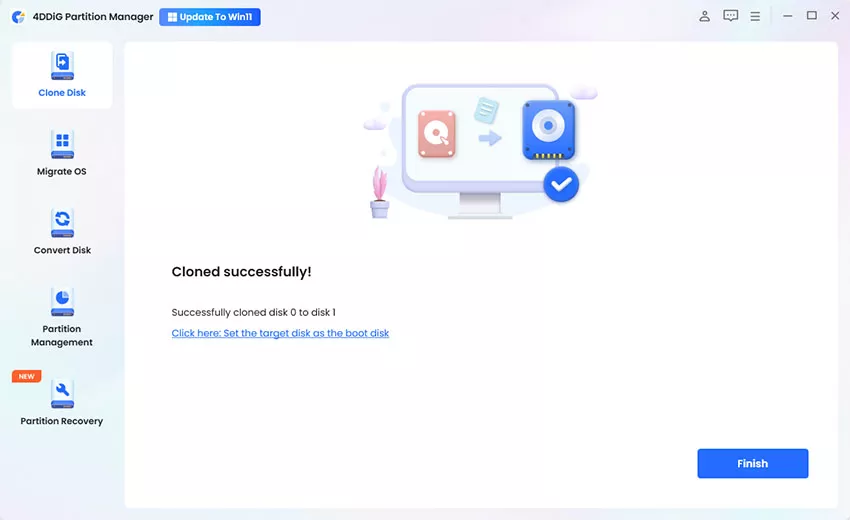
Start by selecting a reputable disk cloning tool. Though many options are available, it is recommended to use 4DDiG Partition Manager because of its intuitive user interface and helpful functions. It supports sector-to-sector cloning of partition sizes and changes their size, and it is also able to create bootable media to ensure a smooth process.
2. Launch the Cloning Software:
Open the 4DDiG Partition Manager and select "Clone Disk" from its main menu. The tool itself is very user-friendly, with easy navigation to guide you through the process of cloning.

3. Select Source and Target Drives:
You will be asked to select a source disk—your current hard drive—and a target disk: your new SSD. Be sure to pick the right disks, so that you do not overwrite something important. Confirm your choices and proceed to the next step.
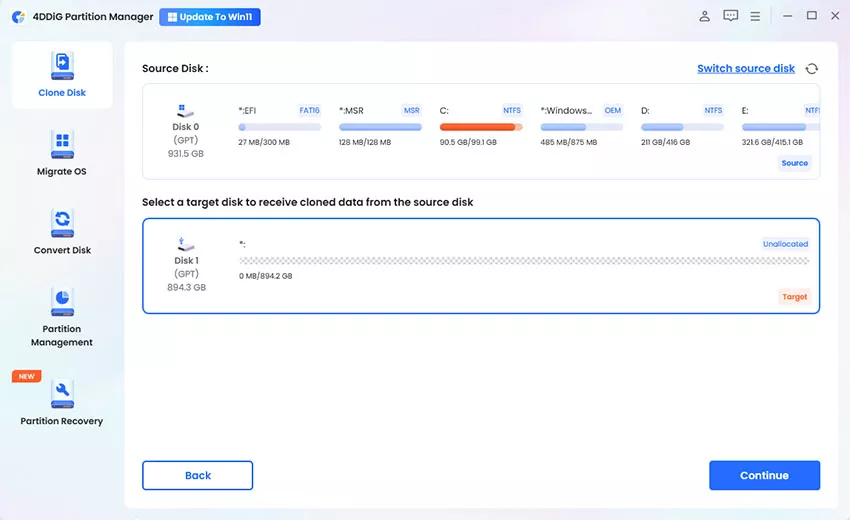
4. Start Cloning:
Click "Continue" to begin cloning. This software will copy every data present on the old hard drive to a new SSD, which may take a little time, depending on the data you have. Be patient and let the process progress without any disruptions.
Step 4: Install the New SSD
Now, the exciting part—getting your new SSD installed and running! Here are the steps to install the SSD in the computer, ensuring everything fits together:
Switch off Your Computer: Go ahead and switch off your computer—disconnect all cables from the computer. It's always best to work on a machine that is completely powered off to avoid any mishaps.
Open the Computer Case: Pop the little screws at the side of the panel cover case, using a small Phillips screwdriver. You may have a special panel or the back cover of a laptop to take off.
Remove the Old Hard Drive: Carefully extract your old hard drive. If it’s mounted with screws or brackets, gently remove them. Set the old drive aside in a safe place—you might need it later for backup or data transfer.
Install the New SSD through SATA: Slide your new SSD into the appropriate slot or external drive bay. For desktop PCs, connect it to an available SATA port and plug in the SATA cable from your power supply unit. For laptops, make sure the SSD is securely fitted in the drive bay or connector.
Close the Case and Power Up: Reattach the side panels of your computer case or laptop cover, and screw them back into place. Reconnect all cables, then power on your computer. You’re now ready to boot from your new SSD!
Step 5: Configure Boot Settings
Congratulations on installing your new SSD! Now, let's make sure your computer recognizes it as the prime boot drive so that you can start enjoying those lightning-fast speeds. Here is a friendly guide to help you configure the first boot drive and settings and get that SSD glowing.
1. Enter BIOS/UEFI: Boot your computer. The instant it starts up, start pressing the key that will get you into the BIOS or UEFI settings. In most cases, this is F2, F10, DEL, or ESC—it varies from computer to computer. More often than not, you'll see a splash screen indicating which key to hit. If you are uncertain, refer to your manual or go online.
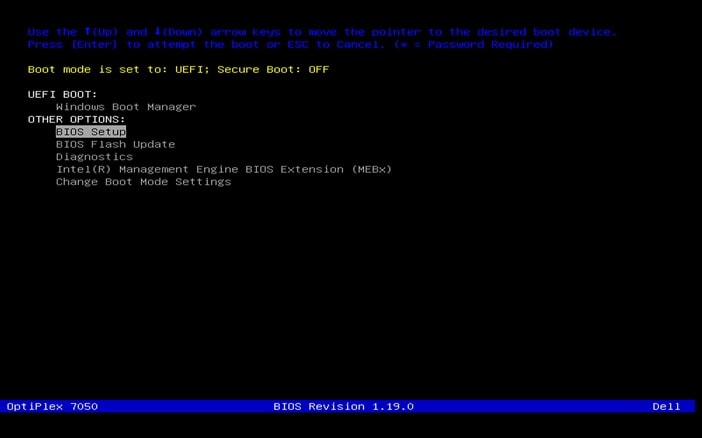
2. Boot Settings: Set up your boot menu or the boot priority section in your UEFI/BiOS. When booting up, your computer will run through these devices in this order. The layout may vary, but look for terms such as "Boot Order," "Boot Priority," or anything similar to these.
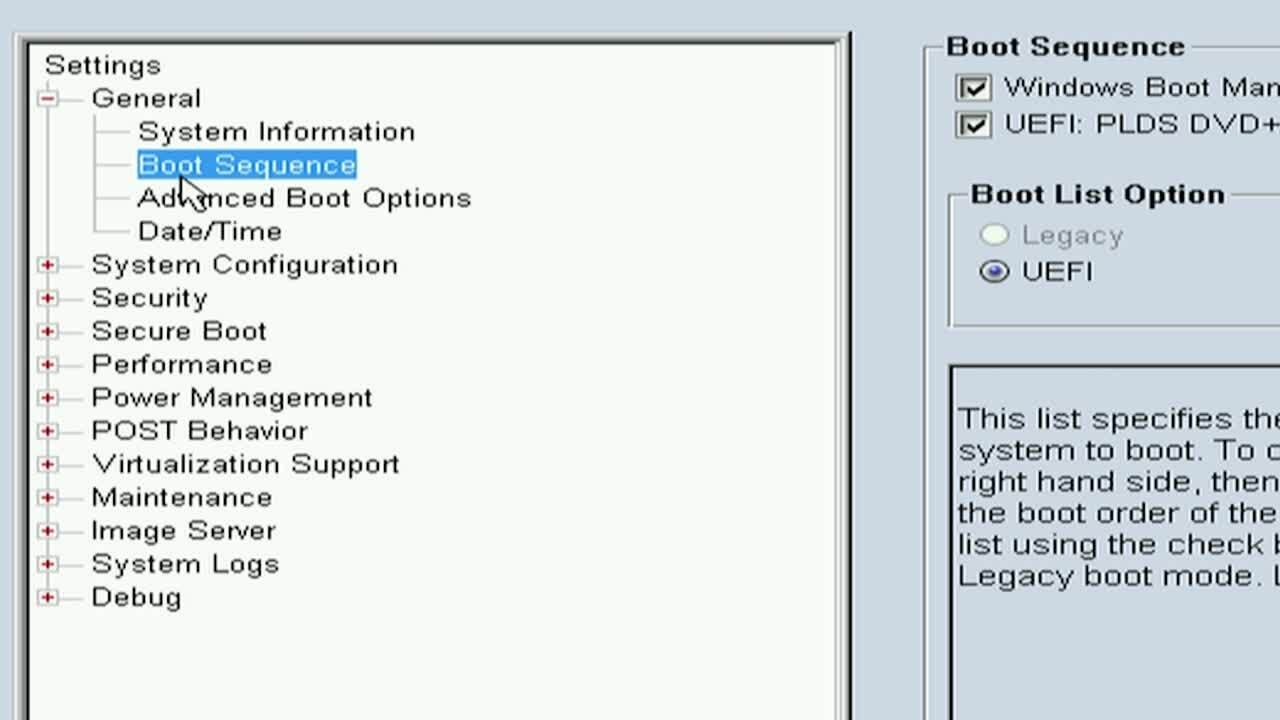
3. Set SSD as primary boot device: Scroll down the 'Boot Device Priority' list to find your new SSD. Use the arrow keys to shift it right up to the top of the list, or use the appropriate keys to set it to be first for boot order. At this stage, you're only telling your PC to look in the SSD first for the operating system.
4. Save and Exit: Now, save changes and exit Settings. Typically, there is an option to "Save and Exit" or a key prompt like F10 to confirm it. When booting, your computer will restart, this time chaining it from your SSD.
5. Test for Smooth Boot: Your laptop or PC should boot from this SSD whenever it boots up. You will notice faster boot times and application access, if everything is set up correctly.
Congratulations! You just performed a major upgrade to your system. If you are experiencing problems and don't get the SSD as an option, double-check the connections and BIOS settings.
Are There Any Reasons Not to Upgrade the HDD to an SSD?
While making the move to an SSD is fabulous for most users, there could be reasons that it won't be the same for you. The truth is, SSDs aren't the right choice for everybody.
First, SSDs almost always have higher per-gigabyte prices than regular HDDs. This can add up if you're storing large video files, photos, or games. If you don't need extra storage or faster drive speeds, you may want to stay with an HDD, and stay in your budget.
Another thing you should consider is how much life your desktop or laptop and current hard drive has yet to serve. If your hard drive is still running OK, and you haven't been frustrated over significant slowdowns, then you might consider if spending the money would be worth it. Why fix what isn't broken?
Last but certainly not least, this procedure may sound overwhelming if it's your first time attempting a systemic overhaul. In that case, you can always find help on IT bulletin boards and forums. There are many friendly guides and professionals who can help you troubleshoot if you run into problems with an upgrade.
SDD Servers at VPSServer
Just as upgrading a computer from HDD to SSD significantly improves aspects such as velocity, dependability, and performance, it will also boost the performance of your virtual server. VPSServer offers innovative VPS solutions that exploit SSD technology so that all your websites, apps, and databases run at considerably improved speeds and efficiency. Whether running resource-intensive applications or hosting high-traffic websites, our SSD-powered VPS ensures you get the best performance possible.
By integrating the latest in storage technology in personal computing and our VPS offerings, VPSServer is committed to delivering the speed and reliability you need. So, whether upgrading your home setup or scaling your online presence, the shift to SSDs is a step towards greater efficiency and success.
Conclusion
Upgrading your computer from an HDD to an SSD is one of the best decisions to realize improved performance. With this step-by-step guide, you now know how to perform the smooth transition of data without loss of files or by reinstalling your operating system in general. Though it might look pretty intimidating at first, with the right tools and a little bit of patience, it is manageable for most users.
Doing so will bring faster boot times, quicker application loads, and a generally livelier system. The difference will be apparent immediately, allowing you to be more productive and enjoy daily computing.
Frequently Asked Questions
How do I install a Samsung SSD on my computer?
Installing a Samsung SSD is straightforward. Connect the SATA drive with a SATA cable, and plug the NVMe SSD directly into the available NVMe port on your motherboard. Then, clone your existing drive using the Samsung Drive Data Migration software. First, clone your computer, restart it, and enter your BIOS/UEFI settings to set the SSD as your primary drive. There you have it—you're good to go!
Do SSDs defragment themselves like HDDs do?
There is no need to defragment SSDs as one does with HDDs since it causes more wear than necessary on the SSD. The continuous memory cell stress created by defragmentation will shorten its life expectancy. There are no moving parts in SSDs, and the data inside these drives is accessed quickly without rearranging the files, including their fragments.
How can I copy my operating system from an HDD to an SSD?
4DDiG Partition Manager quickly relocates your Operating System from an HDD to an SSD. It clones the system precisely so that everything is copied directly to the SSD; no problems occur. You won't need to reinstall Windows on your new Disk or risk data loss.
Is it possible to upgrade from an HDD to an SSD without losing data?
Yes, specialized cloning software can make it possible to upgrade from an HDD to an SSD without losing files. It copies everything from the HDD to the SSD, so everything is retained precisely as on the previous drive. There is no need to reinstall anything; your files will remain exactly as they were.

Bilal Mohammed is a SOC analyst and cybersecurity expert who is passionate about making the internet safer. He has expertise in penetration testing, networking, network security, web development, and security operations center (SOC) services. In his spare time, he looks for security and design vulnerabilities to protect against attacks from hackers.